
Bathroom leakage without breaking tiles: what to check before demolition
Sometimes a bathroom leak can be repaired without lifting the whole floor, but the decision depends on the water path. Leakage can come through failed tile joints, the drain or pipe penetrations, a plumbing defect, or the concealed waterproofing layer. Surface or local repairs may be enough for the first three; a failed waterproofing layer usually needs access from above and may require tile removal.
Quick answer
Can bathroom leakage be fixed without breaking tiles?
Sometimes. If the water is entering through failed joints, the drain perimeter, a pipe penetration or a local plumbing defect, the repair may be possible without removing the whole tiled floor. If the concealed waterproofing layer has failed, tiles usually need to be lifted to rebuild that layer. Rule out plumbing and visible surface entry points before agreeing to demolition.
Published · Updated
Part of the bathroom leakage guide, which covers every usual source.
Signs you will notice
- Damp on the ceiling below that gets worse after baths
- Black, cracked or missing grout lines
- A gap or crack around the floor drain
- Damp on the wall beside the shower area
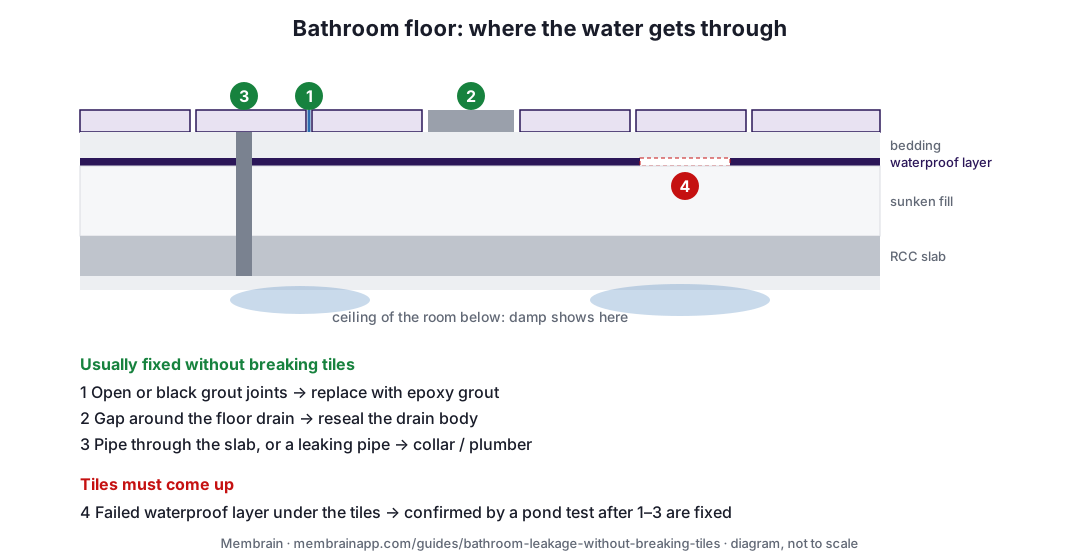
What can and cannot be fixed without breaking tiles
Start with checks that can rule out plumbing and visible surface entry points before considering demolition.
Cause 1
Open or failed tile joints: may be repairable without removing tiles
Grout is cracked, missing or open, especially near the drain and shower area. Damp below may be local rather than spread across the whole floor.
Check it yourself: Inspect the joints for missing or loose material. Open joints can allow water beneath the finish, but their presence alone does not prove they are the only source.
How it is usually fixed: Inject the damp spots from below with PU foam followed by PU resin, and reseal the bathroom's tile joints with epoxy grout.
Cause 2
Gap around the floor drain or a pipe: often a local repair
Damp below is concentrated near a drain or a pipe that passes through the floor.
Check it yourself: Inspect the joint between the drain body and surrounding finish, and around penetrations, for visible separation or cracking.
How it is usually fixed: If the entry point is confirmed at the drain or penetration, repair that local detail with a compatible flexible sealant or the approved system detail; replace a damaged drain component if required.
Cause 3
Plumbing leak: repair follows the pipe, not automatically the whole floor
Damp persists even when the bathroom floor has not recently been wetted, or follows a service route.
Check it yourself: With all outlets off, unexplained movement at the water meter can suggest a supply leak. Drainage leaks need a different test and may not show on the meter.
How it is usually fixed: A plumber finds and repairs the leaking pipe or fitting. The wall surface is repaired only after it has dried.
Cause 4
Concealed waterproofing failure: tile removal may be required
Leakage remains after visible joints and drain details are addressed and no plumbing defect explains it.
Check it yourself: A controlled flood or pond test, done after repairs have cured and with the drain detail properly isolated, can show that the wet area still leaks. It does not identify the exact concealed defect by itself.
How it is usually fixed: Remove the tiles and fill, waterproof the concrete with a flexible membrane including corners and pipe collars, re-form the slope, retile and fill the joints with epoxy grout.
Methods follow proven, manufacturer-approved waterproofing systems. The right one for your building depends on what is found on site.
What a photo can and cannot tell you
Photo guidance points to the likely source. It is not a confirmed diagnosis.
A clear photo can show
- The state of the grout and the gap around the drain
- Where the damp shows below
- Whether tiles are cracked or loose
A photo cannot settle
- Whether the waterproofing layer under the tiles has failed
- A pipe leak inside the wall or floor
Simple checks before you call anyone
- 1Check whether the damp changes with bathroom use or continues when the floor has stayed dry.
- 2Inspect joints, the drain perimeter and pipe penetrations for visible openings.
- 3If a supply leak is possible, use the water meter or a plumber's isolation test before pricing waterproofing.
- 4If surface details are repaired, let the materials cure as specified before any controlled flood or pond test.
- 5Photograph the floor and the damp patch below before and after each test.
When you need someone on site
- The meter test shows a leak you cannot locate
- Damp continues after resealing the joints and drain
- You are about to agree to break the floor
Where Membrain works on site, a site diagnosis confirms the source, and thermal imaging finds hidden leaks before anything is broken. The app checks whether your pincode is covered.
Common mistakes that waste money
- Breaking the whole floor before checking plumbing, joints and drain details.
- Assuming visible bad grout proves that grout is the only source.
- Applying a clear surface coating and treating it as proof that concealed waterproofing is sound.
- Retiling after demolition without rebuilding and testing the required waterproofing layer.
Before you accept a contractor's quote
- Does the quote explain what evidence shows that tiles need to come up?
- Has a plumbing source been considered before waterproofing work is priced?
- Does the quote specify how joints, drains and penetrations will be detailed?
- If a flood or pond test is proposed, does it state when and how the test will be done?
Already have quotes? Membrain can compare them on scope, not just price. Planning the work instead? A written specification makes quotes comparable.
How this guide is built
Diagnostic basis
Membrain separates visible signs from possible water-entry mechanisms, then asks for evidence that can distinguish the remaining causes.
Repair-source governance
Public guides stay brand-neutral. When Membrain creates a repair plan, methods and products come from current approved manufacturer documents in its technical library.
Evidence limits
A photo cannot confirm concealed pipes, waterproofing layers or moisture depth. When remote evidence cannot separate the causes, a site inspection is the correct next step.
Technical notes behind this guide
Deeper reasoning on the moisture patterns and water-entry mechanisms used to interpret this problem.
Kya bina tile tode bathroom ki leakage theek ho sakti hai?
Kabhi-kabhi bina poora floor tode repair ho sakti hai. Agar paani joint, drain detail, pipe penetration ya local plumbing defect se aa raha ho, toh repair local ho sakti hai.
Agar neeche ka concealed waterproofing layer fail hua ho, toh us layer tak pahunchne ke liye tiles uthani pad sakti hain. Tod-phod se pehle plumbing aur visible entry points ko rule out karo.
Frequently asked questions
Can tile joint filling stop a bathroom leak?
It can when failed joints are confirmed as the water-entry route. Regrouting cannot repair a failed waterproofing layer below the tiles, so the result should be checked rather than assumed.
How do I know the tiles really need to be removed?
Tile removal becomes more likely when leakage remains after plumbing and visible surface details have been ruled out or repaired, and testing still points to the concealed wet-area system. A pond test can show that leakage persists but does not locate the exact defect by itself.
Do clear waterproof coatings over tiles work?
A surface coating may reduce water entry in some surface defects, but it cannot rebuild a failed concealed membrane or a defective drain detail. Treat it as a system-specific repair, not a universal substitute for diagnosis.
Not sure which one it is?
Share a photo and answer a few questions. Membrain shows the likely sources and a repair plan built from proven waterproofing methods, in minutes. Free to start.
Remote guidance, not a site inspection.